Page 3 - Hide a gun drop down shelf
Main menu:
Page 3
Instructions
I have had several requests for mounting instructions. I had not given it a thought that some do not
do this kind of project everyday. When you receive your shelf, & after unpacking it, stand it on it's legs,
and hold it by the front of the top of the shelf. Hold the magnetic key by the wood, with the magnet
facing down, and drop the key in the center-center from about 2" above the top. You will note that the key
went directly to the spot where it is activating the lock. Without moving the key, pinch the swing down
bottom against the top of the shelf, and the bottom will immediately be released. Now is the time,
with the shelf opened up on a table, to mount your gun, plus lights & magazines if you wish.
Wall Mounting
Find the spot on the wall where you wish to mount the shelf. Level & measure two spots on 13" centers.
On those spots, drill a very small location hole. If one of the holes happens to have a stud behind it, then that's
the spot where you will use the furnished 2 1/2" threaded lag screw. If there is a hollow space behind the sheet
rock, then you will use the 3"x 1/4" machine screw with the toggle attached. Drill 2, 1/2" holes on the 13" center.
If your not certain about the toggle, just Google install toggles in sheetrock. You may need to slightly
enlarge the 1/2" holes for the toggle to slip in, but it should pop through with a slight tap of a hammer. Be certain
to keep the shelf level as you tighten the toggle. Properly tightened, the shelf will easily hold up to 25#. If
you have any further questions, don't hesitate to contact me via e-mail or phone, [leave a message].
PS don't forget to send me pictures of your shelf mounted.
Contact me via e-mail @ jim@jimshideagun.com
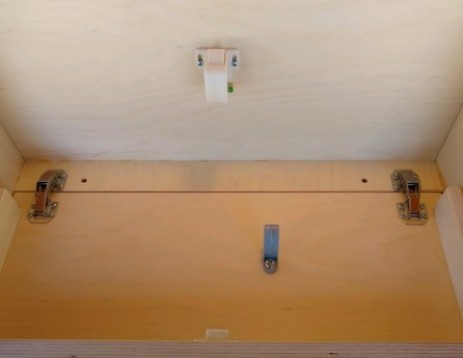
Tips on finishing
The picture on the left shows an unfinished shelf in the open position. If
you remove the top latch, be careful to mark and then reinstall it in its
exact position. Most choose to tape it tightly, so as not to get any paint
or stain inside it. That could permantly damage it. There is no reason to
remove the catch on the bottom, as it will work fine even if painted over.
I recommend you do not completely remove the hinges to dismantle the
bottom part. Simply remove the screws on the swing down bottom, leaving
the hinges firmly attached to the top back brace. This should insure that
the shelf should need no adjustment when you reassemble it. Be sure to
use a good phillips #1 screwdriver to remove & replace the screws. If
you should lose or damage a screw, it is a #4 x 3/8"self tapping sheet
metal screw.
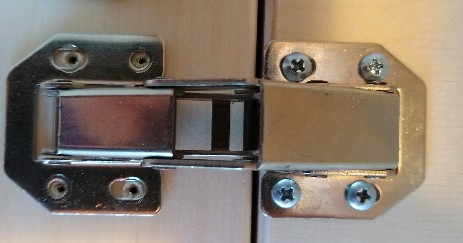
The picture on the right shows the proper alignment for reassembling
the shelf after finishing, the holes should align with the center of the
marks left on the hinge when first assembled. Reassembled this way
will insure the unit will work properly. The picture below, shows the
improper way to reassemble, the holes do not center up with the
original assemby marks, this could allow rubbing when opening
& closing.

Feel free to contact me at this website, if you should have any questions,
either in refinishing or in mounting. I personally answer all correspondence.
Click here jim@jimshideagun.com